

How to Master Fashion Flats for a Strong Portfolio

A creative fashion sketch may catch attention, but the technical flat proves whether your idea can be understood, developed, and produced. To master fashion flats, you need more than clean lines. You need to communicate proportion, construction, function, and detail with the precision that designers, pattern makers, buyers, and manufacturers expect.
Fashion flats can feel restrictive at first, especially for students who love expressive illustration. Yet they are one of the most useful tools in a portfolio. A strong flat turns a concept into a clear visual instruction. It shows that you can think beyond the mood board and begin working like a fashion professional.
What Fashion Flats Actually Communicate
A fashion flat is a two-dimensional technical drawing of a garment, usually shown from the front and back. Unlike a fashion illustration, it does not aim to create movement, personality, or a dramatic silhouette on a figure. Its role is clarity.
A well-drawn flat helps another person understand what the garment is made of and how it is built. It may show a neckline, seam placement, sleeve shape, darts, pockets, closures, cuffs, stitching, panels, and hem details. In a professional setting, this information supports design discussions, technical packs, sampling, production, and line presentations.
The key difference is intention. Illustration sells a feeling. Flats explain a product. Both belong in a strong portfolio, but they should never be treated as interchangeable.

Start With Proportion Before Detail
The most common mistake in beginner flats is adding details before the garment shape is correct. A beautiful row of buttons cannot rescue an unbalanced jacket, and a carefully drawn pocket will look wrong if it sits too low on the body.
Begin with a simple center front line and establish the garment’s overall length, width, and silhouette. Ask practical questions: Is the shoulder dropped or structured? Does the waist sit at the natural waistline or lower on the hip? Is the leg straight, tapered, wide, or flared? Is the hem symmetrical?
Work from large shapes to small information. First draw the outline. Then define the construction lines. Only after that should you add trims, topstitching, buttons, zippers, or texture notes.
This order matters because fashion flats are read quickly. If the silhouette is not immediately understandable, the viewer has to work too hard. In design, clarity creates confidence.
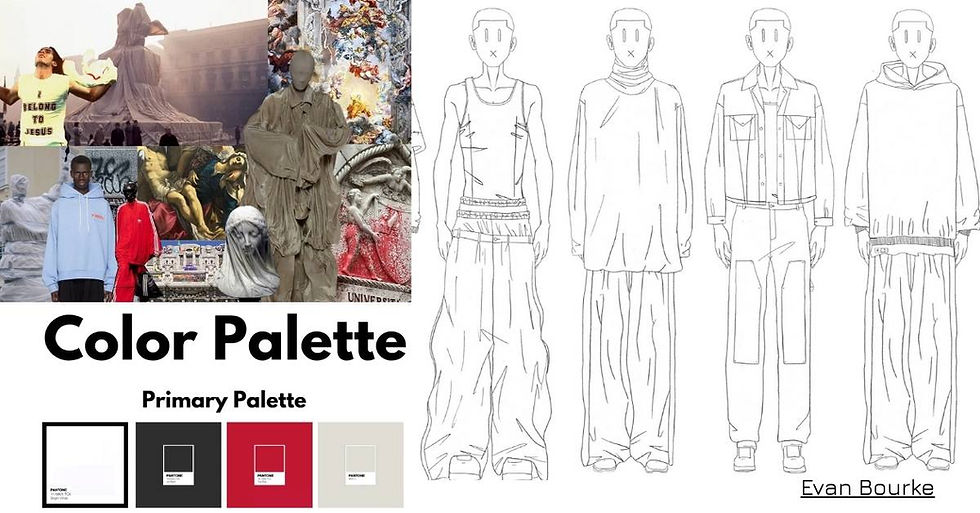
Use a Consistent Garment Template
A template gives your flats a repeatable foundation. It does not need to be complicated, but it should help you place standard areas consistently: shoulder line, bust level, waist, hip, crotch, knee, and hem.
For tailored garments, proportion must be especially disciplined. A blazer with narrow shoulders and an oversized body may be intentional, but the drawing needs to make that choice unmistakable. For knitwear or oversized streetwear, the trade-off is different: the flat may need a little more room around the body to express ease and volume without becoming vague.
You can work by hand or digitally. Hand drawing develops observation and control, while digital software makes revisions faster and supports polished technical presentation. The best method depends on your current goals, but understanding proportion comes before choosing a tool.

Build the Garment Like It Will Be Made
The strongest fashion flats reflect real construction. Instead of seeing a dress as one outline, learn to see it as connected components: bodice, skirt, sleeve, facing, collar, lining, closure, and finishing.
Look carefully at garments in stores, on runway images, and in your own wardrobe. Notice where seams begin and end. Study how a shirt collar connects to a stand, how a sleeve joins an armhole, or how a waistband supports a skirt. The more construction you observe, the more believable your flats become.
Do not invent lines simply to make the drawing look busy. Every line should have a purpose. It may represent a seam, a dart, a fold, a stitch line, a panel, or an edge. If you cannot explain why it is there, question whether it belongs.
Front and back views should also work together. A front zip may require a back yoke. A dramatic front drape may influence the garment’s side seam. A hood, belt loop, or back vent should be included where relevant. Incomplete back views are a frequent portfolio weakness because they suggest the design was considered only from one angle.
Make Line Weight Work for You
Line weight is a small technical decision with a major visual effect. A flat drawn with one heavy line thickness can look clumsy. A flat drawn with very faint, identical lines can become difficult to read.
Use slightly stronger lines for the garment’s outer edge and lighter lines for internal seams and details. Stitching should be finer still. This hierarchy helps the eye understand the garment structure without needing labels everywhere.
Keep your style consistent across a collection. If one flat uses bold outlines, dense dashed stitching, and exaggerated pockets while the next is minimal and delicate, the page loses unity. Consistency signals professional control.
Digital drawing makes this easier because you can create line-weight rules and reuse them. However, software cannot replace judgment. A technically perfect vector line still needs to describe a garment accurately.
Add Details That Support Production
Details are where a basic flat begins to look industry-aware. Show visible hardware, closure placement, pocket openings, plackets, cuffs, collars, ribbing, gathers, darts, and major topstitching. When a feature changes the garment’s appearance or construction, include it.
At the same time, avoid overloading the drawing with every possible mark. A flat is not a finished technical specification on its own. It is a visual tool that may later be supported by callouts, measurements, fabric information, and construction notes.
For a portfolio, focus on the details that make your design distinctive. If the central idea is a convertible trench coat, show the detachable sections and how they connect. If your collection uses engineered panels or asymmetrical closures, make those choices visible. Generic flats weaken an original concept because they do not prove how the concept becomes a real garment.
Know When to Use Callouts
Callouts are useful when a detail is too small or complex to read at the scale of the full flat. A close-up can clarify a special pocket construction, a unique fastening system, embroidery placement, or layered cuff.
Use them selectively. Too many callouts can make a portfolio page feel like an instruction manual. One or two well-chosen enlargements are often more effective than a crowded page of labels.
Create Fashion Flats as a System
Professional portfolios rarely need one isolated flat. They need a visual system. If you are presenting a capsule collection, your flats should share the same scale, line quality, page layout, and level of information.
Place each garment so it is easy to compare with the others. This helps a reviewer see balance within the collection: outerwear against lightweight pieces, statement looks against commercial options, and repeated design codes across different silhouettes.
Color flats can also be useful, especially when fabric blocking or print placement is central to the design. Still, black-and-white technical flats are often the clearest starting point. They force the construction to stand on its own. Once the drawing works in monochrome, color can add another layer of communication rather than covering uncertainty.
For digital portfolios, keep the page clean. Give the drawing room to breathe, align text carefully, and use readable labels. Presentation is part of the design message. A thoughtful flat can lose impact when squeezed into a disorganized layout.
Practice With Real Design Questions
The fastest way to improve is to stop treating flats as a copying exercise. Choose a garment and answer a design question through the drawing. How would you adapt a classic denim jacket for a modular wardrobe? What changes would make a slip dress suitable for day-to-night styling? How can one recognizable sleeve shape appear across a small collection?
This type of practice develops both technical skill and design thinking. You are not just tracing clothes. You are making decisions and learning to communicate them.
At Milan Fashion Campus, technical drawing is approached as part of the wider design process: research, concept development, silhouette, fabric direction, portfolio editing, and professional presentation all need to connect. A flat is strongest when it belongs to a clear point of view.
Review Your Flats Before Adding Them to a Portfolio
Before you present a flat, view it at full page size and then at a smaller scale. If the garment is confusing when reduced, simplify the lines or strengthen the hierarchy. Check that front and back proportions match, closures are placed logically, paired elements are symmetrical when intended, and all key details are visible.
Then ask the most useful question: could another person understand how this garment works without hearing you explain it? If the answer is yes, your flat is doing its job.
Every clear technical drawing is evidence that your creativity can move from an idea into a product. Keep building that bridge, garment by garment, and your portfolio will start speaking the language of the fashion industry.


Comments